Using OData with Planview
| Source: | DataSource |
|---|---|
| Language: | English |
| Topic: | Planview |
| SubTopic: | Reporting |
| Last Edit By: | DochyJP |
| LastEdit: | 2022-03-07 |
| Document type: | User Guide |
| Status: | Active |
| Access: | free |
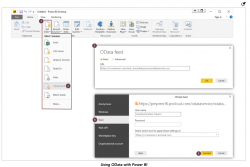
Using OData with Power BI Desktop
To use OData with Power BI Desktop:
- In Enterprise One, generate an authentication token and copy it.
- In Power BI, open a new report.
- In the Home ribbon, click Get Data > OData Feed.
- In the URL box, enter your Enterprise One URL and append /odataservice/odataservice.svc.
- Click OK.
- In the left pane, click Basic.
- In the User Name box, paste the authentication token generated in Enterprise One.
- In the Select which level to apply these settings to box, enter your Enterprise One URL.
- Click Connect.
- . Click to enlarge
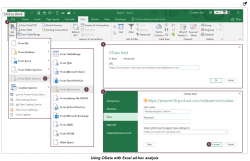
Using OData with Excel Ad-Hoc Analysis
To use OData with Excel ad-hoc analysis:
- In Enterprise One, generate an authentication token and copy it.
- Create or open a worksheet in Microsoft Excel.
- In the Data ribbon, click Get Data > From Other Sources > From OData Feed.
- In the URL box, enter your Enterprise One URL and append /odataservice/odataservice.svc.
- In the left pane, click Basic.
- In the User Name box, paste the authentication token generated in Enterprise One.
- In the Select which level to apply these settings to box, enter your Enterprise One URL.
- Click Connect.
Using OData with Other Third-Party Applications
To access Planview Enterprise One data in other third-party applications in SSO environments, you must have an authentication token generated by Planview Enterprise One. If you are not using SSO, you must have the user name and password of the Planview Enterprise One account you will use to connect to the data.
To access Planview Enterprise One data in other third-party applications: 1. In a browser, navigate to the OData service file using the following URL format:
- https://<Planview_Enterprise_One_domain>/odataservice/odataservice.svc
- For example: https://yourcompany@pvcloud.com/odataservice/odataservice.svc
2. In the XML file that the browser displays, search the collection href fields for the name of the Planview Enterprise One table that you want to import into the third-party application, as shown in the following example:
- <collection href="Grant">
3. On the start page in the third-party application, for the connection option, select OData.
4. On the OData connection screen, for the server, enter the URL from step 1, then enter a forward slash (/) and the name of the table from step 2, as shown in the following example:
https://yourcompany@pvcloud.com/odataservice/odataservice.svc/Grant
5. Select the option to use a specific username and password.
6. Enter your authentication credentials as follows:
- If you are using SSO, enter your authentication token in the username box. The authentication token contains the password you need, but if the third-party application requires the password box to be populated, enter some text in the password box.
- If you are not using SSO, in the username box, enter the database name, a backslash (\), and the user name for Planview Enterprise One account you want to use. Then enter the password for that account in the password box. The following example shows the format for the user name if the database is db23 and the user name is admin1:
- db23\admin1
7. Click OK.
- If the connection is successful, the third-party application displays a screen listing the fields for the Planview Enterprise One table.
8. Repeat this procedure to add more tables until you have added all the tables you need. 9. After you have added all the tables you need, use the third-party application to create reports, table relationships, and more.

